The spider curl is the exercise that exposes every lifter who's been ego-curling. You can't swing. You can't use momentum. You can't lean back. Your chest is pinned to a bench and gravity is working against you the entire time. Whatever weight you're curling standing — cut it in half. That's your spider curl weight.
It's humbling. It's also one of the best biceps exercises for building peak and size, especially in the short head. Here's how to do spider curls with proper form, what muscles they work, common mistakes, and where they fit in your training.
What Is a Spider Curl?
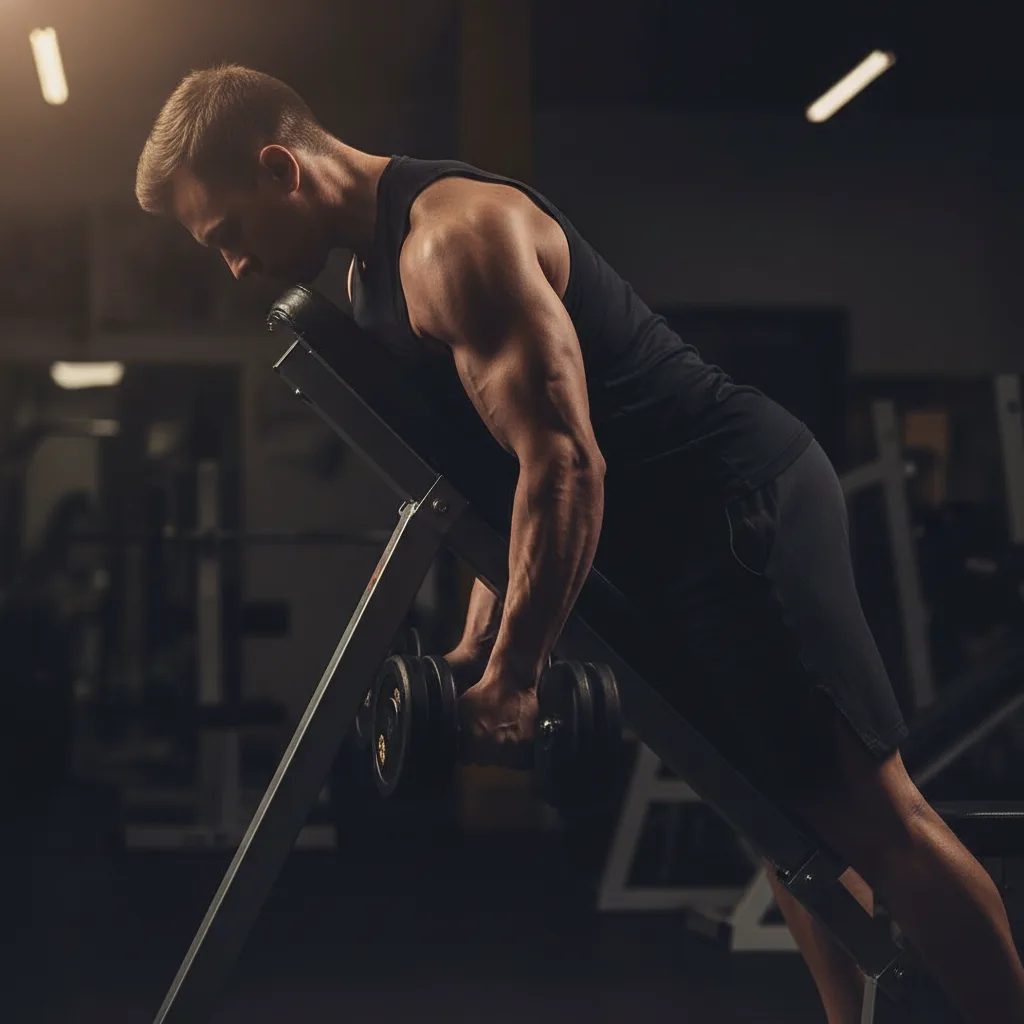
A spider curl is a bicep curl performed face-down on an incline bench — usually set to about 30-45 degrees. You drape your chest over the top of the bench, let your arms hang straight down, and curl the weight up. The bench locks your body in place, which eliminates every possible way to cheat.
You can do spider curls with dumbbells, a barbell, an EZ bar, or even a cable machine. The dumbbell version is the most common and the easiest to set up.
The name comes from the position — you're draped over the bench like a spider hanging off a wall. Not the most flattering image, but the exercise earns its place.
Spider Curl Muscles Worked
Biceps brachii — both heads. The spider curl hits both the long head and the short head, but the arm position favors the short head more than most curls. Because your arms hang in front of your body (not behind it like incline curls), the short head gets a stronger contraction at the top of each rep.
Brachialis. The muscle underneath the biceps assists throughout the movement. Spider curls with a neutral grip (spider hammer curls) shift even more emphasis to the brachialis.
Brachioradialis and forearm muscles. Your grip has to work hard to hold the weight while your arms are hanging straight down. Expect your forearms to feel it, especially on higher rep sets.
What doesn't work: your ego. The bench removes momentum, body English, and every cheat pattern. Whatever you lift on spider curls is pure biceps.
How to Do Spider Curls
Step 1: Set the Bench
Set an incline bench to 30-45 degrees. The angle matters — 45 degrees is the most common and provides a good balance between range of motion and comfort. Going steeper (closer to vertical) reduces the range of motion. Going flatter makes it harder to position yourself.
Step 2: Get in Position
Approach the bench from the back side and drape your chest over the top edge. Your feet should be on the floor behind the bench for stability. Your arms hang straight down over the front of the bench, fully extended. Grab a dumbbell in each hand with palms facing forward.
Your armpits should be near the top edge of the bench. If your shoulders are hanging over, you're too far forward. If your chest barely touches the bench, you're too far back.
Step 3: Curl
Curl the dumbbells up by flexing at the elbow. Keep your upper arms perpendicular to the floor — they shouldn't swing forward or backward. Squeeze hard at the top. The contraction at the peak is where spider curls shine — the resistance profile keeps tension on the biceps even at full contraction, unlike standing curls where the weight stacks over your elbow and tension drops.
Step 4: Lower Under Control
Lower the dumbbells slowly — 2-3 seconds — until your arms are fully extended. Don't let them drop. The eccentric is where you build muscle. Full range of motion at the bottom, hard squeeze at the top, controlled tempo throughout.
Reps and Sets
3-4 sets of 10-15 reps. Spider curls work best in moderate to high rep ranges. This isn't a heavy strength exercise — it's an isolation movement. Use a weight that lets you feel every inch of the curl.
Coach's Note: If you don't have an incline bench, you can do spider curls draped over the back of a flat bench or even the top of an incline bench flipped the other way. It's not as stable, but it works. Some gyms also have dedicated preacher curl stations that work — just face the opposite direction.
Benefits of Spider Curls
Zero cheating. The bench eliminates momentum, swinging, and every form of body English. If you've ever wondered whether you're actually curling with your biceps or just throwing weight around — spider curls answer that question immediately.
Constant tension on the biceps. Unlike standing curls where tension drops at the top and bottom of the rep, spider curls keep the biceps loaded throughout the entire range of motion. The time under tension is higher per rep — you feel it immediately.
Short head emphasis. Your arms are positioned in front of your body, which shortens the long head and puts the short head in a stronger position to work. If you want wider biceps and a fuller look from the front, spider curls deliver.
Better mind-muscle connection. When you can't cheat, you have to focus on the muscle doing the work. Beginners especially benefit from this — spider curls teach you what a proper bicep contraction actually feels like.
Great for building bigger biceps with lighter weight. Because the exercise is so strict, you don't need heavy weight to get a stimulus. This makes spider curls joint-friendly and ideal for lifters dealing with elbow or wrist issues.
Common Spider Curl Mistakes
Swinging your upper arms. Your upper arms should stay vertical and motionless. If they're rocking forward and backward, you're using momentum to move the weight. Pin them in place and let your forearms do the only moving.
Bench too steep. If the bench is almost vertical, your range of motion is tiny and the exercise loses most of its benefit. Keep it at 30-45 degrees.
Using too much weight. This is the most common mistake by far. Spider curls are humbling — most lifters need to use 40-50% of their standing curl weight. If you're curling 30 lb dumbbells standing, start with 15s on spider curls. Nobody's watching. Nobody cares.
Cutting range of motion short. Let your arms fully extend at the bottom. That full stretch is part of what makes spider curls effective. Stopping short to pump out faster reps defeats the purpose.
Not squeezing at the top. The peak contraction is where spider curls differentiate themselves from other curls. Hold the top position for a full second and squeeze your biceps as hard as you can. That's where a lot of the magic happens.
Spider Curls vs. Preacher Curls vs. Incline Curls
Three curls, three different arm positions, three different emphases.
Spider curls — arms in front of your body, short head emphasis, constant tension, peak contraction focus. Best for: bicep width and the squeezed look.
Preacher curls — arms braced on a pad in front of you, stretch at the bottom, strong isolation. Best for: controlled overload and lower-range strength.
Incline curls — arms behind your body, long head emphasis, deep stretch at the bottom. Best for: bicep peak and lengthened-position training.
A complete bicep program uses at least two of these three. If you're only doing one, pick the one that targets your weakness. Most lifters neglect spider curls — which is a mistake, because the short head is what makes biceps look full from the front.
Spider Curl Variations
DB spider curl. The standard version described above. Dumbbells allow each arm to work independently.
Barbell spider curl. Same position, both arms curling a barbell or EZ bar together. Lets you use slightly more weight but removes the unilateral benefit.
Spider hammer curls. Neutral grip on the dumbbells. Shifts emphasis to the brachialis and brachioradialis. Excellent for overall arm thickness.
Reverse spider curl. Overhand grip. Targets the brachioradialis and forearm extensors. Brutal but effective for complete arm development.
Cable spider curl. Set a cable low, position the bench in front of it, and curl. The cable provides more consistent tension throughout the range of motion than free weights.
Frequently Asked Questions
Are spider curls better than regular bicep curls?
They're different, not better. Spider curls eliminate cheating and emphasize the short head with constant tension. Regular curls allow heavier weight and more overall volume. Use both — spider curls as an isolation finisher, regular curls as your primary mass builder.
What angle should spider curls be?
30-45 degrees works best. 45 degrees is the most common starting point. Going steeper reduces range of motion. Going flatter makes positioning uncomfortable. Start at 45 and adjust based on how it feels.
What is a good weight for spider curls?
Most lifters use 40-50% of their standing curl weight. If you normally curl 30 lb dumbbells, start with 12-15 lbs on spider curls. The strict form and constant tension make lighter weight feel much heavier than expected.
Are spider curls good for the peak?
Spider curls primarily target the short head, which adds width to the bicep. For peak (which comes from the long head), incline curls are a better choice. A complete bicep program includes both — spider curls for width, incline curls for peak.
Can I do spider curls on a preacher bench?
Yes. Face the opposite direction on a preacher bench — drape your chest over the pad instead of bracing your arms on it. It's not a perfect fit but it works well enough, especially in gyms without adjustable incline benches.
What We Recommend
REP Fitness AB-3000 Adjustable Bench
Spider curls require an adjustable incline bench — and this is the one we keep coming back to. Adjusts from flat to 90 degrees with accurate angle markings, heavy-duty steel frame, and a pad wide enough to drape over comfortably. Works for spider curls, incline curls, presses, and every other bench exercise you'll ever need.
The Bottom Line
Spider curls are one of the most underused biceps exercises in the gym. They eliminate cheating, keep tension on the muscle through the full range of motion, and target the short head in a way that very few other curls can. Set the bench to 45 degrees, use lighter weight than your ego wants, control every rep, and squeeze hard at the top. Add 3-4 sets to your arm day or pull day and watch what happens when your biceps actually have to do the work.